
Anterior Pelvic Tilt & Back Pain: Fix It With Exercises & Stretches
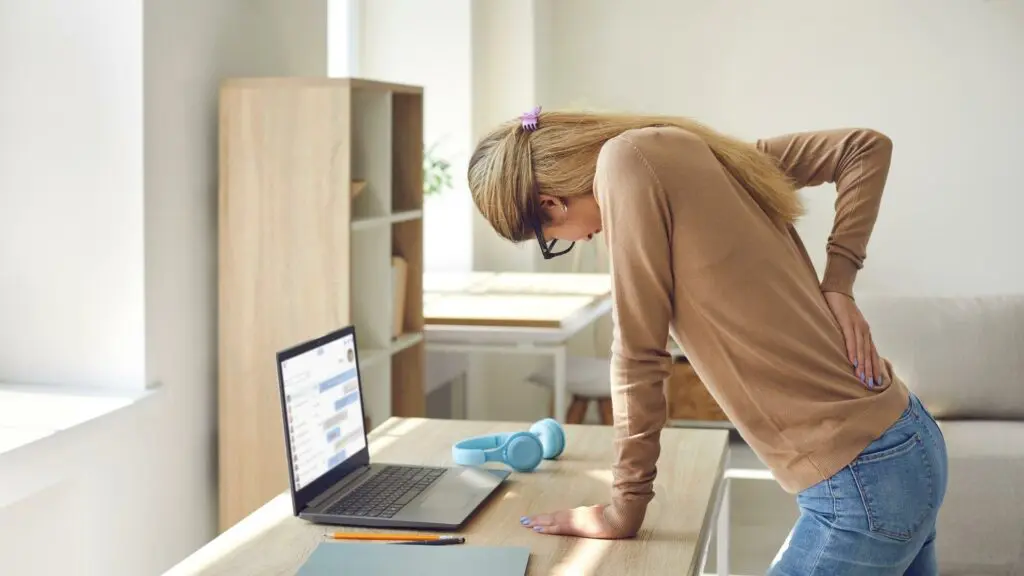
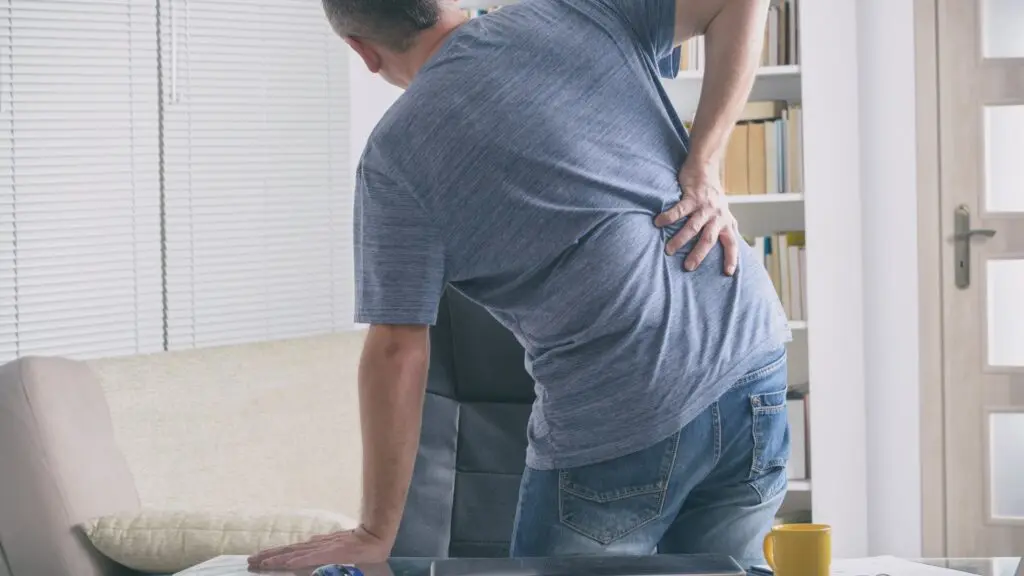
Anterior pelvic tilt is an issue with the resting position of the pelvis rocking forwards, commonly this is associated with lower back pain and occasionally symptoms of sciatica down the leg. At its root, anterior pelvic tilt is a postural issue that can be remedied very effectively with postural education backed up with exercises and stretches that are targeted to specific areas of the problem.
Unfortunately true anterior pelvic tilt seems to be remarkably less common than you might think. Drawing from experience over the years of objectively measuring thousands of pelvic and lumbar alignments on load bearing images we have seen that, although some do have anterior pelvic tilt and associated hyperlordosis of the lumbar spine, many in fact do not have this, and have in fact other issues that are occurring in the lower back with false diagnoses of anterior pelvic tilt leading to practices which fundamentally have made the individuals lower back health and alignment verifiably less healthy.
Today we’re going to take a very deep dive into your anterior pelvic tilt. We’ll help you better understand what it is and why it could be leading to your lower back pain, we’ll also cover how it is commonly measured and how it should be measured. Finally we will go through some exercises that do work to eliminate an anterior pelvic tilt. But be aware, these do work, so you want to make sure you do not overshoot the mark!

What is anterior pelvic tilt
The pelvis is designed to transfer forces from the lower limbs into the spine via the sacroiliac joints and as such in the upright position there is a resting neutral that the spine is designed to be in. We do not have conscious control of the individual joints of our spine and so under normal circumstances the pelvic alignment will influence the normal healthy curve of the lower back.
In simple terms, if you tuck your bum down and under, this is posterior pelvic tilt, which we talked about in detail on a previous episode of the podcast, to the contrary, if you lift your bum up and your pubic symphysis on the front of your pelvis down, this is anterior pelvic tilt.
When we anteriorly tilt the pelvis, the tummy will often stick out below the belly button as your rectus abdominus muscle relaxes. Your lower back muscles tighten up and pull your sacrum towards your head at the same time. As this is happening, your hamstrings and gluteal muscles will be relaxing to allow the back of your pelvis to lift up and your bum to stick out. In the lower back, we see that the lumbar spine is now forced to arch backwards more to keep your body upright, otherwise you would be bending forwards.
As you begin to become stuck in this anterior pelvic tilt, you notice a few things. Firstly, you’re not balanced at all. Your tummy is sticking out as mentioned before, a helpful rather graphic visualisation is you tipping your intestines out the front of your pelvis. Everything is pushed towards the front of your abdominal wall. In your lower lumbar spine the facet joints are brought together as a result of the increase in the lordosis which reduces the capacity for shock absorption as well as narrowing the small holes where the nerves come out of the spine. Finally the last lumbar disc, the L5, S1 disc which is sat on the sacrum is now supporting the spine and upper body whilst being on a steeper slope, therefore it experiences shearing forces. The intervertebral discs are very strong and resist compression well, however, chronic shearing forces exploit a range of motion that the discs are not particularly happy handling.
Why does anterior pelvic tilt occur
There are many reasons why anterior pelvic tilt can develop in an individual, it is also important to recognise that it often will be a transient position. Meaning when standing the pelvis drops into the anterior position, but when slouching in an office chair for 6-8 hours it will commonly be in a posterior pelvic tilt position. Common factors that can lead to the development of this pelvic tilt are: tightness in the hip flexors limiting the hip from fully extending and preventing the pelvis from rocking into the normal neutral position. Additionally, incompetence in the core muscles can be a factor, in particular, the control of the deeper core muscles and their recruitment on normal standing. As we discuss in the podcast on the impact of posture on lower back pain, anterior pelvic tilt is a “posture” perhaps a bad one, but it is one, like any other posture, that we have often adapted to. Therefore it is a practice in many ways, as simple as the accent with which we speak or the mannerisms we display subconsciously in conversation. Often there may well be no purposeful intent to tilt your pelvis forwards, nevertheless it has been adopted.
The good news is that like other inappropriate postures, if you do display objective anterior pelvic tilt, there is a good chance that you can take effective steps to fix it, as we will discuss later on.
Do you really have anterior pelvic tilt?
As mentioned earlier we have significant experience measuring pelvic and lumbar alignment over the years using load bearing imaging of people standing in a normal upright posture. As a result we have seen many patients over the years who claim to have been diagnosed with anterior pelvic tilt by previous practitioners. This however, more often than not, has been found out to be untrue.
The unfortunate truth is that if you have been diagnosed with anterior pelvic tilt from a visit to your local osteopath, physio or chiropractor and this was done by physical examination, without imaging, chances are that you do not have anterior pelvic tilt. Physical examinations are notoriously inaccurate at making such detailed anatomical statements of structure and alignment, especially when it comes to the lower back and pelvis.

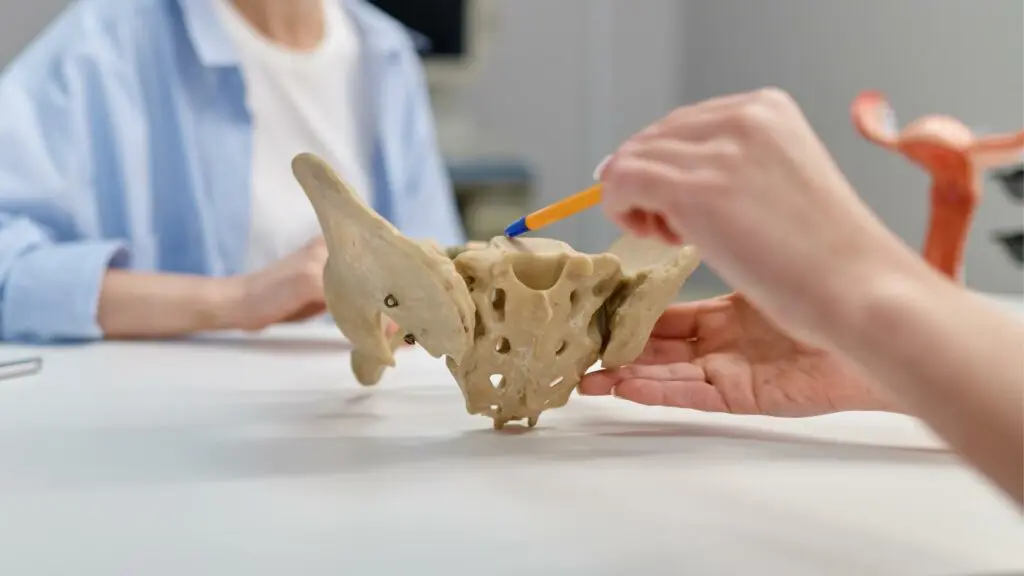
Why is pelvic tilt so hard to measure accurately
To begin with, it is not, if you do it on imaging. But most healthcare practitioners do not use upright load bearing imaging to make such observations. They do a physical exam instead. And here all sorts of illusions can be created that lead to a false diagnosis of anterior pelvic tilt.
These illusions are fundamentally a result of the skin and soft tissues creating an impression of something on the surface of the skin, that is supposedly an indication of what’s happening deep within the body at the level of the skeleton For some with developed glute muscles, or a larger lay down of fat tissue in this region the illusion can be created of a “curve” from the buttocks into the lower back and so the comment, you have APT and an increased lordosis is made. Perhaps if you have poor core competence, the lower abdominal region could be “sticking out” a little, which could additionally be used as evidence. Then there is the feeling of tightness in the lower back which could be misconstrued as meaning the muscles are shortening in the lumbar spine pulling the lordosis into an increased rate of curve and tilting the pelvis forwards.
Then there is the attempt to be more accurate by using surface markers such as the ASIS and PSIS little bony prominences on the front and back of the pelvis and looking at an imaginary line drawn between these two points. The issue being here that there is such incredible inaccuracy in these surface points and the ability to visualise and then mentally measure this “angle”.
The problem with fake anterior pelvic tilt
The biggest problem we have seen over the years is the countless times people have been told they have anterior pelvic tilt only to see that in fact they have posterior pelvic tilt when properly evaluated and measured on imaging. Now there are two scenarios that could be true here for the sake of being fair.
Firstly, it could be that they did actually have anterior pelvic tilt when they were initially diagnosed and have done such a good job with their exercises that they just “overcorrected”. If this is the case which it certainly could be, it shows that the practitioners recommending such exercises have no reasonable follow up process for making sure such events do not occur. A little overshoot is fine however, if you’re prescribing proper exercises that do work to reduce pelvic tilt you should have some mechanism for estimating rate of change. For example, we would see that for those with increased pelvic tilt and curve, it tended to be relatively self limiting at 25-30% increase, and in extreme and rare cases 50% increase in the degree of anterior pelvic tilt. A 25% increase could typically be brought back into range in a period of approximately 3 months. So doing the same exercises for 2 years would naturally result in a real problem!
The second outcome, which I would suggest is more likely, although this is just a hunch, is that the individuals did not have anterior pelvic tilt in the first place.
The important takeaway here is the following: if you’re going to make an effort to change the spine alignment or pelvic alignment, you should have an idea of how much needs to be improved and then how long that will take. Both are so commonly missing in the case of patients and members we have seen with the diagnosis of anterior pelvic tilt.
Why is anterior pelvic tilt bad for your lower back
Anterior pelvic tilt is usually a diagnosis that is made in response to some lower back pain or sciatica. And really it could be considered to be a contributing factor rather than a causative factor. It certainly would be a factor that would be detrimental to the recovery process if we were diagnosed with APT and an L5, S1 or L4, L5 spondylolisthesis as this anterior slip of the one vertebra on the other would be made more possible in an anteriorly rotated pelvis.
In short, as mentioned earlier, it means that your load bearing position is one of reduced efficiency. You’re exposing certain tissues to increase forces that they are not happy to be exposed to. For example, being in this position will “relatively” engage your sacroiliac joints so there will be less give in them, this is fine at certain times, but perpetually it is an issue. Secondarily, you will be creating more shear through the L5, S1 disc as mentioned earlier. This means that load bearing movements are going to be more provocative to this region than under normal circumstances.
These changes are small and so one could try to dismiss them, the issue is that they are there day in and day out. And when there is an injury, such as a failure of that L5, S1 disc, and inflammation builds up. Because of the reduced spaces where the nerves come out, due to the hyperlordosis necessary in the anterior pelvic tilt position, the inflammation reaches critical levels sooner and so symptoms come on quicker and more severely. Additionally, when you then try to round your lower back to make the holes larger, you have to lean forwards more, increasing load on the lower lumbar disc further tying yourself in knots for some relief.
How You Can Fix Anterior Pelvic Tilt With Exercises & Stretches
For the rest of the article, we are assuming you do have OBJECTIVE anterior pelvic tilt that is SIGNIFICANT, meaning really, that there is more than a 10-15% increase in the tilt, and resultant increase in lumbar curvature. We would strongly recommend that you verify this BEFORE working through these exercises. If you are at all in doubt you would be better off focusing on the principles of a neutral spine without these modifications. For more help and detailed guidance you can check out membership to the Back In Shape Program.
These exercises do work when done right so you must make sure you have some measurements before and are checking things at intervals of 3 to 6 months to make sure you do not overshoot your pelvic tilt! You should also be continuing with your full strengthening work as is normal to build resilience in the lower back in general.
Standing wall drill to set your posture first
This simple starting point is going to help you have an appreciation for the upright alignment and as you add in the next exercise, the core engagement and chest pop, it can be combined with this one to ensure good posture.
- Stand with your heels touching the wall or 1 inch away from it (if you have large glutes).
- Your bum should touch the wall.
- Your middle back should touch the wall (the bit of the spine between shoulder blades).
- Finally bring your head to touch the wall looking straight ahead.
In this position you’re standing in the best position you can without deeper analysis. Holding this position by subtly pressing your head into the wall can help you mentally set this position. From here you can combine this drill with the next exercise.
Core engagement & chest pop to help set your pelvis & spine
Whilst doing the Standing Wall Drill, a chest pop and core engagement is a great way to help you further the correct engagement of these muscles to support good spine and pelvic alignment again using the wall as a guidewire or sorts.
- In the same position discussed previously, place both hands on your stomach below your belly button.
- Engage the Core-set of muscles by drawing the midsection in, without an obvious pelvic tuck, as you do this you will feel the support on the front of your abdominal wall increases.
- Almost simultaneously, engage the chest pop, by elevating your breastbone, and depressing your shoulders, down and backwards toward the wall. You should feel your shoulder blades slide down ever so slightly.
- Hold this position and the engagement for 10 seconds to 20 seconds.
- Repeat for reps as necessary.
This is the kind of practice you can do regularly when walking around the house, every now and again, a couple of reps through the day. This is a practice and not a strengthening exercise, you’re working to install a good practice that is committed to your “postural memory” instead of standing and allowing your pelvis to tip forwards and back arch.
Posterior pelvic tilt plus leg straightening
This modified version of pelvic tilt is going to help with the success of the previous practices. As you do the original pelvic tilt to eliminate and overcorrect the pelvic position into a posterior tilt, you’re then going to straighten your legs which will pull the hip flexors. Your job here is to condition the coreset of muscles particularly in the lower region of your core as you lower your legs. These will resist the anterior pull on your pelvis.
- Begin by lying on your back with both knees bent, feet on the floor.
- Engage a posterior pelvic tilt and engage the muscles tightly.
- It is additionally helpful if you engage your chest pop movement in this position.
- Lower your one leg to the floor outstretched and press the whole leg into the floor and hold.
- Immediately bring the second leg down and repeat the engagement so both legs are engaged as well as maintaining your pelvic tuck and chest pop.
- At this point you should feel engagement in your lower abs as well as the leg muscles.
- Hold the position for 3 seconds
- Slowly bring the legs back to the start position one at a time.
- Repeat for 10 reps.
You must keep in mind what you feel in the outstretched position at point 6 as this will help you on the previous exercise as well as the next exercises we discuss.
Hamstring engagement – glute hip thrusts and hip hinge
Working to engage the hamstrings strengthening them in coordination with good pelvic control is important. It is important to note that the posterior pelvic tuck process needs to be limited in these movements especially where load is being added. You instead should focus more on preventing allowing the pelvis to rock into anterior tilt, particularly at the top part of each of the reps. Hopefully the previous exercises have improved your awareness.
The hip hinge movement for anterior pelvic tilt
If you look around the average gym you will see the common sight of people engaging in deadlifts or hip hinges driving their hips forwards at the top of the reps, and even leaning backwards, this is particularly preposterous if you’re someone with anterior pelvic tilt. Yet it is so important to do the movement because it is driving through your glutes and hamstrings to control your pelvic position. The hip hinge for example is literally allowing your pelvis to rock anteriorly about the axis of your hips and then be brought back up to neutral.
- Start standing tall thinking about the wall drill with an imaginary wall this time.
- Your hands will be holding either a kettlebell or barbell or “pretending” to do so.
- Slowly hinge at the hips to lower the weight down until your hamstrings stop you going any further.
- Your spine should remain strong throughout without bending in any way!
- Then use your hamstrings and gluteal muscles to drive you back up to the starting position.
- Take care not to arch your back at the top of the movement and allow anterior pelvic tilt or arching of your back.
The hip thruster movement for anterior pelvic tilt
This movement is sometimes taught with an active posterior pelvic tilt which could be acceptable in the short term but we find it is preferable to focus on avoiding anterior pelvic tilt instead as this builds longer term good habits. Working with the previous exercise which tends to focus a little more on the hamstrings, this one works more on the gluteals. Care again must be taken to RESIST ANTERIOR PELVIC TILT at the top of the repetition. Doing so will often lead to a stretching sensation on the front of the hips and a challenge on the core in the same region as with previous exercises.
- Start with your mid back on a bench and feet positioned appropriately away from the bench, your body will make a rough V-shape from your knees down to your bum and then back up to your shoulders at the “bottom” of the rep.
- You will then drive your hips up to finish in a position where there is a straight line between your knees, through your hips to your shoulders, your knees will be at 90 degrees with your shins at right angles to the floor.
- At this top position the anterior pelvic tilt PULL will be strongest and so is your controlling roll to maintain neutral pelvic alignment.
These two exercises work on the one half of the equation, that is to say the strengthening of the posterior chain and muscles that are “allowing” your pelvis to rock into anterior rotation. You are taking an active roll to drive with the glutes and hamstrings to strengthen them. Your core-set of muscles are working as well to provide stability, building strength and control in the muscles that oppose the anterior pelvic tilt. You are additionally being more thoughtful with your movement and therefore less likely to allow for such anterior pelvic tilt to take place.
At the same time you are taking steps to avoid habits that could be detrimental for the long term, such as allowing a posterior pelvic tilt to creep into your form, it’s no good getting rid of an anterior tilt only to be stuck with a posterior tilt instead! Hence the focus more on resisting anterior pelvic tilt than forcing posterior tilt on these two strength building movements.
Hip flexor stretching: PNF & long holds plus couch stretch
The last part of the equation is to work on elongating the muscles that are so often tight end restricting hip extension. Granted, you should also take steps to address the root cause of this and modify your daily life to try to eliminate excessive sitting and opportunities for your hip flexors to tighten further. The common mistake with this stretching is going to be that you allow your pelvis to rotate anteriorly. Think again about the CONTROL limiting anterior rotation instead of trying to overtly posteriorly tuck the pelvis. This isn’t as important as in the load bearing lifts but still you don’t want to ingrain a habit of constant pelvic tilt for reasons previously mentioned.
Psoas targeted stretching for anterior pelvic tilt:
A simple lunge stretch here will target the psoas muscle deep in the front of the hips.
- Start in a lunged position kneeling on the floor.
- Move your front leg to the outside a touch, to “open the hips a little”.
- Lunge forward thinking about dropping your pelvis to the floor.
- You should feel the stretch on the front of your hip socket.
- Hold the stretch for 30 seconds (or other hold as discussed later)
- Repeat for the other leg.
Couch stretch for anterior pelvic tilt
This stretch targets the rectus femoris a little more and so the stretch will feel a little stronger down the front of your thigh.
- Kneel in front of a sofa chair or wall.
- Align your shin parallel to the wall or side of the chair so it has support.
- Lunge forwards with the other leg for counter support.
- Straighten up your torso as far as you can to feel the stretch come on.
- The back knee should be bent.
- Hold for 30 seconds (or other hold as discussed later)
- Repeat for the other leg
Stretching holds to help make changes in flexibility faster
Standard stretching holds of 30 seconds work really well, when done regularly through the week. You can additionally incorporate PNF stretching which is where you engage active control of the muscle. This means for example, you hold the stretch for 10 seconds, then contract your hip flexor for 10 seconds, then relax again for a further 10 seconds. This contraction helps result in an instant increase in the range of motion and the stretch of the muscle.
The long hold stretch whereby you’re holding for 2 minutes or so per stretch, steadily eking out a little more range though the duration of the hold is another strategy that can be employed to effectively add more range of motion. Just make sure that you’re comfortably supported in the stretch, perhaps using chairs or a stool to lean on during the stretching time so you can relax into the stretch for the duration.
Anterior Pelvic Tilt In Review
Ultimately anterior pelvic tilt is a more uncommon issue, and it is frequently misdiagnosed through inferior analysis mechanisms, resulting in problems for individuals who pursue effective exercises and stretches for eliminating anterior pelvic tilt. We’ve seen this enough times to be cautious about recommending anterior pelvic tilt exercises. That being said it does happen and so we’ve provided a series of drills and practices, exercises and stretches that will help you eliminate your anterior pelvic tilt. It could be seen as the gaining of active awareness of when you allow your pelvis to drop into that anterior tilt. As a result you gain better control, not through too much in the way of posterior tuck, but a limitation of anterior tilt.
Remember if you do use these tools, to evaluate after 3 to 6 months of practice objectively, to see if it is still required and how much change has been made! This is a must! And finally, you should also be working on a general spine health and strengthening protocol if you’ve been struggling with lower back pain then the membership to the Back In Shape Program can help you with this.


Responses